AuraQ has vast experience helping organisations find the gaps that can be filled to enhance their business. This could be to improve efficiency, integrate legacy systems or deliver new portals and strategic applications to create competitive advantage. Contact us to request a free, no obligation Gap Analysis.
28th May 2019
Extending the functionality of Mendix applications with USB-powered hardware
Introduction
Users typically interact with a Mendix application using either a mouse & keyboard or through a mobile device such as a mobile phone or tablet. However, there are many ways in which these interactions can be extended. In this blog, we’ll be looking at how a 1D (one dimensional) USB bar code scanner can interact with a Mendix application and greatly extend the capabilities available to the user by using widgets in the Mendix App store. Mendix offers a Barcode Scanner widget on their Appstore which allows mobile applications to scan barcodes. This functionality can be added directly into an application but requires users to be using the mobile version of the application. For the day-to-day running of an application it may not be practical to give every user a mobile phone just for the purpose of scanning bar codes due to cost and other issues, such as battery life and the fragile nature of the phones themselves. In this blog we’ll be looking at the functionality that can be provided by using additional hardware, in this instance a 1D USB bar code scanner.
Barcode Scanner
At its most basic level, a bar code scanner can be thought of as a simple keyboard. The action of scanning a 1D bar code converts the bar code from a series of vertical black lines of varying width and spacing into a string value. The scanner used in this blog was a handheld device. The scanning action was completed by pointing the head of the device at the bar code and holding down the trigger button until the bar code was scanned (notifying the user with a beep). Once the bar code is scanned the converted string is passed into whichever window the user currently has open. An example of this is shown in Figure 1:
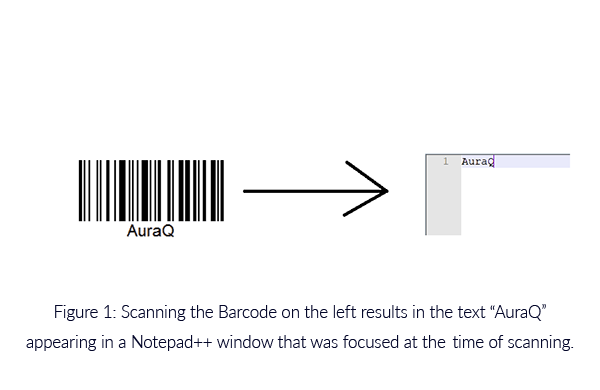
If a scanner is configured to only read the bar code and output the string, then the next bar code that was scanned would be appended directly onto the text resulting in “AuraQAuraQ” appearing in the text editor. If we want to separate the scanned bar codes the scanner itself will need to be configured accordingly. Most bar code scanners allow for characters to be appended after scanning the bar code. This means that we could append a carriage return (enter key), comma or tab to create a set of separated values. In this example, we’ll append a carriage return so that each scanned bar code would appear on a separate line in the text editor.
Use Case
In this blog the scenario is that we want to put a series of items into a parcel and store a record of the items in the parcel. One method would be to have the user create a new parcel record in the application and then select items from a list and associate them to the parcel. If there are several hundred items in the system then the user would have to search through them, based on developer chosen search criteria, which would slow down their work. However, if the items all have bar codes then a scanner can be used to speed up this process. The bar code scanner will return the string representation of the Item and this can be used to retrieve and associate the Item to the Parcel.
Setup
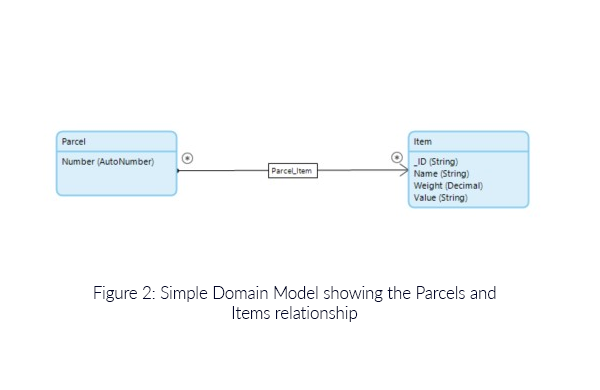
Firstly, we made a Non-persistent entity called “UserScan” in a module called “BarcodeScanner”. This non-persistable entity has one string attribute called “Barcode”. This is used to temporarily store the bar code which has just been scanned. A non-persistable entity is used because the scanned bar codes do not need to be kept permanently. The attribute is just a means of keeping the string representation of the bar code to pass to a microflow which will retrieve the Items. There also needs to be an entity structure to store the Parcels and Items in the system. These are shown in Figure 2.
The *-* association allows for many items to be associated with many parcels. We can therefore just retrieve the Items and set the associations to each new Parcel in the system. Now that the Domain Models are set up, the next consideration is how to make the scanner to interact with the application. As previously discussed, scanning a bar code converts the bar code into a string and writes it to the focused window. In the example in Figure 1 this was Notepad++ but it can also be applied to a text input field on a Mendix page. As we want to add items to a Parcel, the New/Edit page in the Mendix Modeler should look like Figure 3.
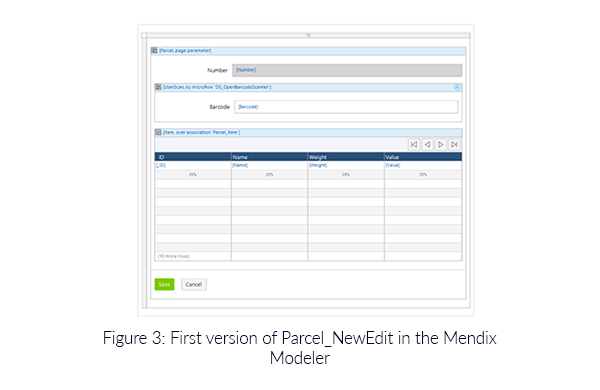
Now, if the user has the Barcode field selected and scans a bar code, they’ll be presented with the string equivalent of the bar code. The user will be able to see the string but a microflow needs to be called in order to associate the Item that was just scanned to the Parcel. The bar code already has an ‘enter key’ appended to it from the scanner and by using two Appstore widgets we can fire off a microflow and maintain the selection of the Bar code input field ready for the next scan. The two widgets that will allow the microflow to be called are Mendix’s “Keyboard Shortcut” and “JavaScript Button” widgets. Firstly, add the KeyboardShortcut and JavascriptMicroflowButton widgets onto the page. Apply a CSS Class to the JavascriptMicroflowButton, such as btn-action, this class doesn’t necessarily need to include any styling but make sure that the class name is unique on that page. On the Keyboard Shortcut widget create a new Shortcut called ‘enter’ and set the Button Class as ‘btn-action’. The result of this is that when the enter at the end of the bar code is read, the JavaScript Microflow Button will be pressed without requiring any interaction from the user.
Now that the JavaScript Microflow Button is being automatically pressed when the bar code is scanned, some JavaScript will need to be applied to both before and after the microflow call. To get the value of the scanned bar code into the microflow, we’ll need to move the focus away from the text box and then refocus afterwards. The reason for the blur and focus is to produce an update of the object on the client-side so that the microflow gets called with the updated bar code value. The before and after JavaScript to achieve this as follows:
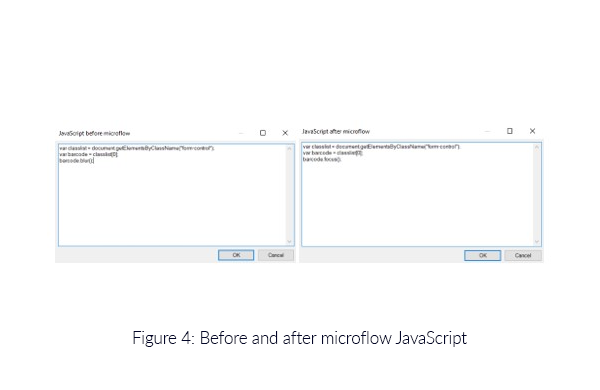
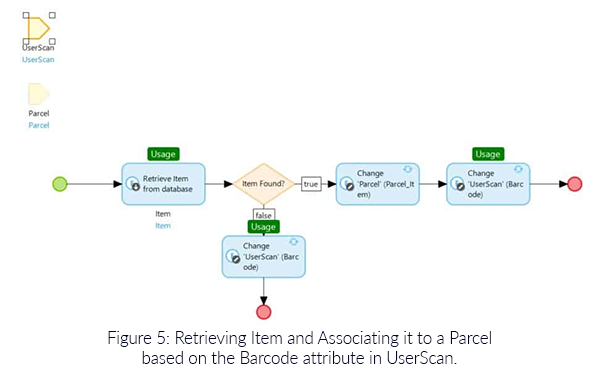
The above code will only work if you have a single input text field on a form, which we do in this case. Now, it’s just a case of writing a microflow that takes the bar code (see Figure 5 for a basic version), retrieves the Item from the database and associates it to the Parcel. Once the association has been set, we can clear the scanned bar code text ready for the next item to be scanned. The final Change ‘UserScan (Barcode)’ clears the bar code string in this example.
Conclusion
This blog has shown how an external piece of hardware can be used in a Mendix application to extend the capabilities by combining widgets from the Mendix Appstore. The modular nature of the widgets means that multiple widgets can be combined, in this case the keyboard shortcut and JavaScript microflow buttons, to create new functionality.
Related Blogs

Drag