AuraQ has vast experience helping organisations find the gaps that can be filled to enhance their business. This could be to improve efficiency, integrate legacy systems or deliver new portals and strategic applications to create competitive advantage. Contact us to request a free, no obligation Gap Analysis.

Mendix Low-Code Fundamentals – Creating the Domain Model
This month, we release our Mendix Fundamentals series, a blog and YouTube tutorial series containing explanations and walkthroughs of some of the key concepts used in the Mendix low-code development platform. Across the four-part series, AuraQ’s team of experienced Mendix developers will cover the essential features required to build an effective Mendix application including the domain model, pages, security and microflows.
As we cover each of the four essential topics, we will provide both a written guide (in our blog) and a step-by-step demonstration in our video tutorial (over on our YouTube Channel) Throughout the series, we will take you through building an event planning application for trail walking events and share development best practices and tips along the way!
Before getting started, it’s worth noting that a pre-requisite for engaging with this series is to have some understanding of data modelling as we will be teaching you how to apply those principles using Mendix Studio Pro the main development environment we use on the Mendix Platform. There is lots of learning material available on the Mendix Academy where you can access the online learning paths. So, if you are looking to sharpen your Mendix development skills and learn from our knowledgeable team of devs, join us as we delve into the Mendix domain model in episode 1.
App modelling and creating the domain model
The domain model is a model that describes the information (or data) used by your Mendix application in an abstract way. It is central to the architecture of your application. There is one domain model per module, each one describing the data used. Each of the marketplace modules has their own domain model; this helps to keep things tidier, more maintainable, and allows you to reuse the modules in other applications in the future.
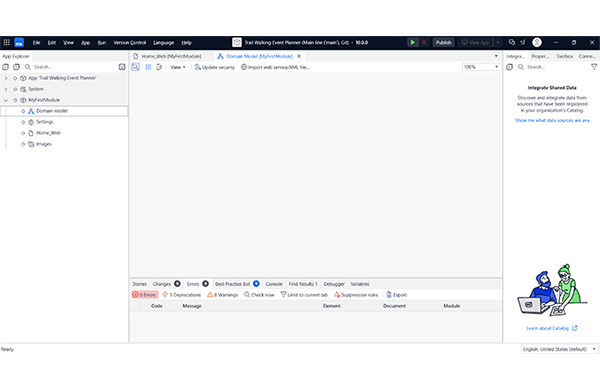
Domain models consist of entities with their relationships to other entities represented by associations. You can also add annotations to domain models to explain how an aspect of the domain model is to be used. Entities and associations represent tables and relationships that are stored in the database. The default is the Mendix built in database however if you click on your App tab in the App Explorer and select ‘Settings’, you will be able to see the database options that are available. To put this into context, for our trail walking example and episode 1 of our Fundamentals series, we will start by creating a Blank App in Studio Pro. We give this a name and opening this up, under MyFirstModule you have the domain model; a blank canvas, that will show what information is being used in your application and how it’s structured.
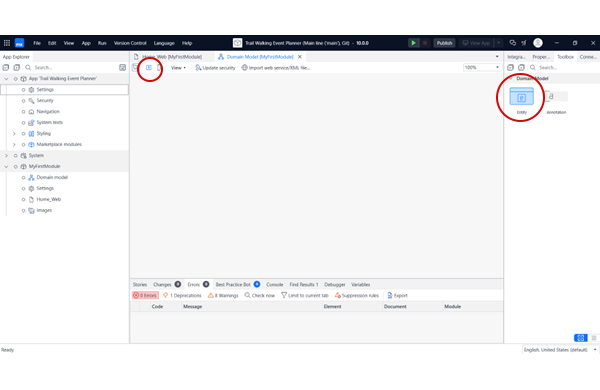
Defining entities within the domain model
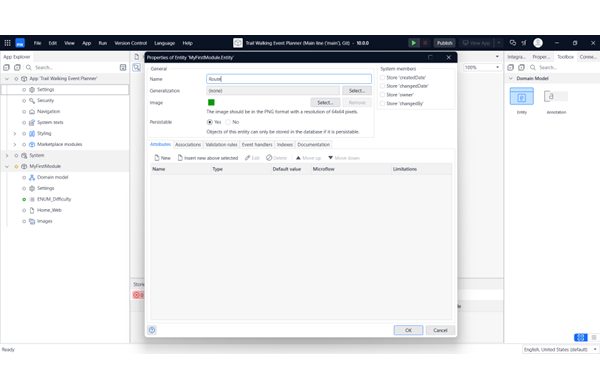
Within the domain model, we will then create entities. A single instance of an entity is an object so in our app, for example, we would have Participants, Routes and walking Events, as individual entities. To create an entity, you either click it from the top bar or select the Toolbox tab on the right-hand side and drag and drop from there. Double clicking the entity opens up the Properties and from here, you would name your entity. At this point, a best practice development tip is to follow the naming conventions for entities which is to use a singular name instead of plural. For example, the trail walking event app needs includes routes, so in that case name it ‘Route’ rather than ‘Routes’. You should also use CamelCase, which means the first letter of each word is capitalised and there are no spaces between words. Attributes that are not surfaced to the user should start with ‘_’ as this denotes it is a technical attribute.
Next, let’s explore some of the options we have when creating an entity. First, you will see ‘Generalisation’ below your entity name field. This setting allows you to select another entity as a parent which means our entity will inherit all the attributes from that entity. Following this, the next option is whether it’s persistable or not. A persistable entity is one that will be saved in the database. If it’s non-persistable, it will only be a temporary state of information and it’ll be removed after the session ends. For Route, the entity is going to be persistable however an example of using a non-persistable entity is where you might use information to make calculations to display analytics or for a chart.
Associating attributes to your entities
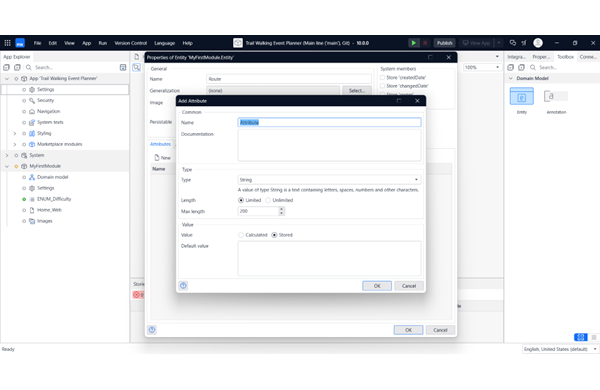
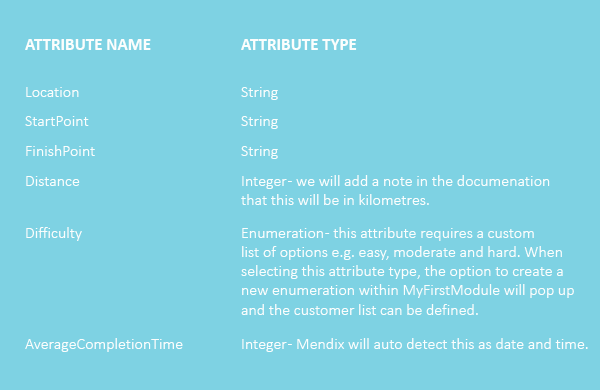
With an entity created, you can then move on to creating attributes (above right image). An attribute represents a characteristic of the objects the entity refers to, in our case, the ‘Name’ and ‘Location’ of a Route. You can add attributes to an entity from the entity properties dialog box. You can also edit them from this dialog box, or by double-clicking the attribute name in the domain model. The naming convention for attributes is just like entity names, names should be in CamelCase. Mendix will understand this and present the labels correctly within the app. You also want the names to be short, simple and relevant to the real-world application. In our example, we call our first attribute ‘Name’.
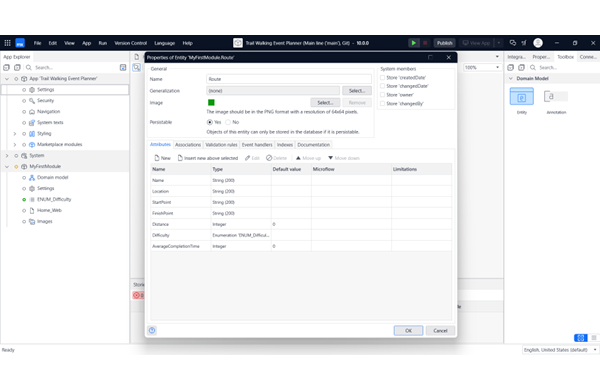
At this point, you can add any notes into the Documentation section (this may be useful to you or other team members when using the entity within the app), and then you can set the attribute ‘Type’. The different data types control what type of input will be used in the application. For example, for a Boolean you’d have a check box to tick for True or leave blank for False and for a String you would have a textbox. You can set whether the string will have limited or unlimited character length (in our example above we leave it limited to 200) and after defining the Type, you can decide whether the value will be calculated or stored. For calculated, it will run a microflow each time that the entity is retrieved. This will calculate the value based on other attributes and variables. Or it’s stored, which will be either user input or stored via user action. For this one we’ll leave it as stored. Below on the left you can see the attributes we have created and the attribute types, on the right shows our final Route entity with all of these attributes.
With Route entity and attributes set up, we then create additional entities for the application, which are ‘Participant’ and ‘Event’. When creating all of these entities, there are also some further considerations for each of them which include:
Validation Rules: The validation rules applied within an entity are simple rules that’ll be applied across the whole app wherever this entity is used. For example, the ‘Name’ attribute should be a required field for the Route entity. You can add an error message to inform the user of the validation rule, for example ‘This is a required field’. When validation rules are applied, a green tick will appear next to the attribute as shown in the image below (left). For the purpose of Fundamentals, we will leave it there, but you can also add more complex validation rules using microflows.
System Members: In the top right corner of the entity properties page is System Members. This is metadata that is saved each time an instance of this entity is created or changed. You have the option to store ‘createdDate’, ‘changedDate’, ‘owner’ and ‘changedBy’. We’ve not used system members for the ‘Route’ entity however, we have used this for the ‘Event’ entity, storing ‘createdDate’ and ‘owner’ by checking the boxes.
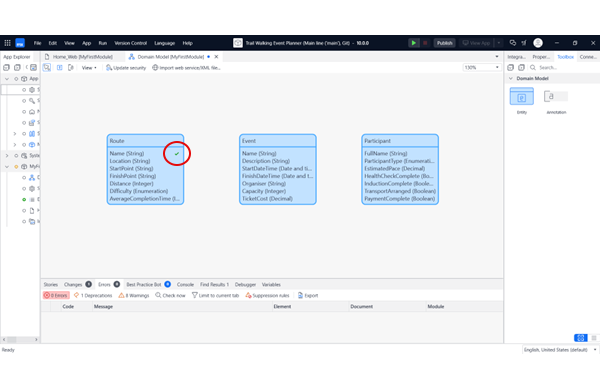
Generalisation: As mentioned earlier in the post, generalisations allow for an entity to inherit all of the attributes and associations from a parent entity. It is a complex topic which will be discussed more in a later series but if you would like to see an example, in the YouTube video we demonstrate how to create a generalisation for our ‘Participant’ entity, however, this is only for demonstration purposes. The finished entities should look like the image on the left.
Using associations to describe relationships between entities
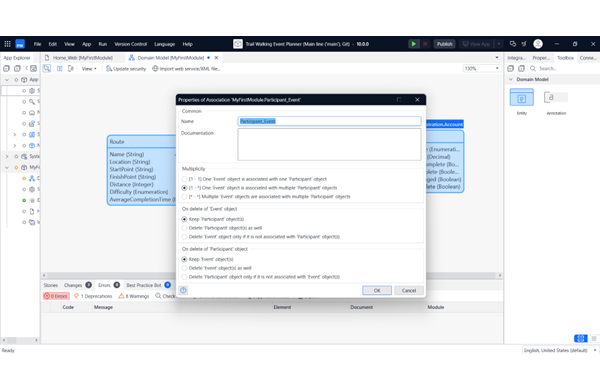
Associations describe the relationship between two entities. They are represented by an arrow between the two entities which also shows the name describing the association. To create an association, you hover over the edge of an entity and click and drag to another. As an example, let’s look at how we would do this between the Participant and Event entities (image above right). The association name defaults to ‘Participant_Event’, which tells you that the owner of the relationship is Participant. You can double click on the association to open the Properties and rename from here. If you have multiple associations between two entities, you would want to rename them to be more clear. The default multiplicity of an association is many-to-one. In this example there are many Participants for one Event, so we leave the multiplicity as it is. The other multiplicity options are one-to-one and many-to-many. You can also change the delete behaviour of an association. For example, if you were to delete an Event, you could have it set up so that it deletes all the Participants who are part of that event. We also want to create an association between the Event and Route entities. Again, there are many Events to one Route. There might be multiple events per year on one route, so we would leave as a many-to-one association. Here is an example of what the Participant_Event association might look like in tables in the database:
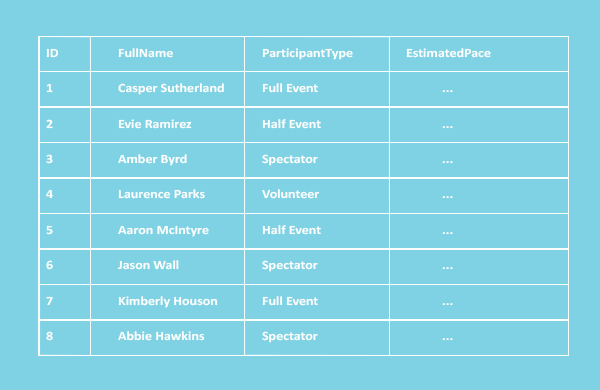
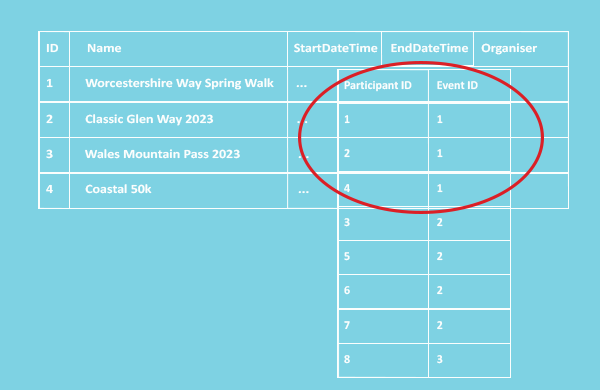
So, for each record in the entity there is a unique ID generated by the Mendix database and for each association there will be an association table which will match the IDs between the entities. Here it shows that there are three Participants registered for the Worcester Way Spring Walk (1) and they are Casper (1), Evie (2) and Laurence (4). You can also create associations between one entity in the domain model to an entity in another module. This can be really useful when using marketplace modules. These are called cross-module associations. That’s it for your domain model! Now you can quickly generate overview pages for your entities to display to your User by right-clicking on an entity and selecting ‘Generate overview pages…’, which brings you to a pop-up. You can select the entities that you want and leave the navigation layouts as default. This will create general overview pages where you can create and edit your records. To add the overview page to the navigation and make it accessible to the User, click on Navigation under your App tab in App Explorer. Then, click on New item in the menu area and name it. You can make this one for your Route entity, so we would name it Routes, select an icon and select the overview page you want it to show.
Running your Mendix app
Now that you have completed all of the basic elements of your domain model, you can click run locally on the top bar of Studio Pro. When the view app button appears not greyed out, clicking this will open the app in a browser. From the home page you can click on Routes in the navigation bar to open the routes overview page and add a new route or edit/delete any information relating to your Routes. You will see there are text boxes corresponding to string attributes and radio buttons corresponding to enumerations.
So…that’s all for the basics of domain modelling! This is the foundation of our trail walking app and in our next blog/video (episode 2), we will be going over the topic of Pages. We introduced in this video how you can create pages from the domain model and we will be extending this by using user stories to develop features to build an intuitive user interface for your application. Finally, we hope you found this blog helpful, if you have any comments or questions, please do not hesitate to get in touch and don’t forget to check out the full tutorial video on YouTube!
Related Blogs


Drag