AuraQ has vast experience helping organisations find the gaps that can be filled to enhance their business. This could be to improve efficiency, integrate legacy systems or deliver new portals and strategic applications to create competitive advantage. Contact us to request a free, no obligation Gap Analysis.

Setup of configuration Data for Mendix Apps
When you get to work on your first Mendix project, an important part to consider is how you move applications between environments for the first time and the initial setup that may need to be done to configuration data. This will not have necessarily been relevant to any local applications you may have developed due to you naturally setting up the config data as you were developing it. However, moving between environments forces you to consider this because now you have a need to make sure any necessary data is setup in the same way as your local environment to allow features to function in the correct manner and in the way in which they have been developed.
You could manually setup this data each time, using front end forms for the various data. However, having to do this each time you move to a new environment will take an unnecessary amount of time and also introduces the risk of human error occurring as data can be missed or entered incorrectly. In this blog I will explore some of the options available to you to automate this setup based on my experience and share how best to achieve the move!
Configuration data
Most data in an application is going to be different for each environment. For example, you wouldn’t have live customer data inside a development database. However, some data would remain the same for consistency during development testing and eventual deployment into production. I will be referring to this as configuration data. The following information would fall under this banner:
- Module synchronisation
- Email templates
- Excel import/export templates
- Deep Link configurations
(*This blog post will assume you know what the above are and what is involved in using them, but more information about any of these points can be found in Mendix documentation/forums.)
Avoiding the beginners trap!
When you are first having to consider moving data, you might fall into the beginner’s trap. I myself fell into this, thinking I could add different microflows into the main “After Start Up (ASU)” microflow to check the existence of the necessary data and to create it if it could not be found.
While this would work, it is not a best practice approach. The data only needs to be created during the initial setup and the ASU microflow would run every time the system needs to be restarted for a deployment. Once the data is created, it would not need to change every time so it is therefore unnecessary to run these checks every time the system restarts. In the event you do need to change this config data you can do it on an adhoc basis.
This method could also cause long periods of downtime between restarts/releases of the environments due to it having to go through these excessive checks each time it tries to start up. This is because for each part of configuration data, you would be making a call to the database to perform the check.
As you develop the app and new features are added, you would then have additional config data which would then need to be added. This would make the length of time it takes to start the app increase each time.
Easily moving data between environments
The easiest way to move data is to have a section of the application dedicated to this setup. This section would include action buttons to individually run each of these. As these configuration buttons have their own individual section, you can easily define access permissions to ensure that only the accounts with the correct permissions have access to perform these configurations. These accounts, for example, could include System Admin or MxAdmin. You can also split the access to make sure certain accounts can only see and create the sections they should.
First release
We recommend, for the very first release of an app to a new environment, the MxAdmin account only be given access to click the button for the synchronisation of modules and the creation of email templates and deep links. The actual System Admin could then be created and have their activation email sent to them.
At that point the System Admin would finish the configuration or creation of Excel import/export templates as well as any other configurations that are needed for the app. This way you have an appropriate segregation of duties as the MxAdmin account is only necessary for the initial setup and is the only account created by default.
You can customise these microflows to suit the needs of your application, but the ones used in this example all follow a pattern of checking if a template exists to determine if it needs to be created. If it doesn’t exist, then the microflow will run a sub microflow to create the template based on its type and then add it to an overall list. As such:
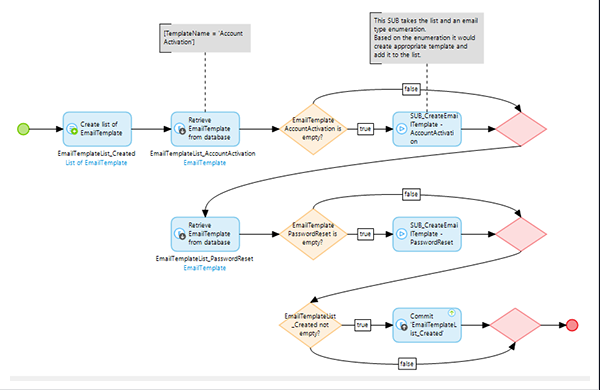
This is the basic version of this concept and you could look to expand it in your own system to suit your needs. For example, you could create a system to queue up these configurations to run in a certain order and then have someone activate this queue to make them all run in the appropriate order during the initial configuration.
It would be a good idea to still have the option of running them individually as well as there will no doubt be a change in the future which would require a new template of some kind, for example, a new email type. In that scenario, you would only need to update the email template microflows with the relevant template creation and have the System Admin run just the email template configuration button after the change has been deployed.
Summary
In summary, when you need to move your Mendix app to a new environment you will need to consider your approach to the setup of necessary configuration data. While there are multiple ways to go about this, I hope this blog has helped show you the best way to approach this by setting up a configuration area and to have a System Admin be in charge of performing the setup. You can use this concept as a base and change it to best suit the needs of your app.
Related Blogs


Drag