
Mendix Studio Pro Tips and Tricks for Everyday Development


I joined AuraQ as a Junior Mendix Developer in February and have spent the past few months building my knowledge through hands-on projects, structured Mendix training, and achieving my Rapid and Intermediate Developer certifications. As part of that journey, I've discovered several useful features and capabilities within Mendix Studio Pro that aren't always highlighted in the standard learning paths. With the platform continuing to evolve, it's easy to miss some of the newer functionality that can help improve productivity and streamline development. In this blog, I'll share some of the features, tips, and enhancements I've found particularly valuable. Whether you're just starting your Mendix journey or are an experienced developer looking to stay up to date with recent releases, there's hopefully something here that you'll find useful.
Set as Return Value
For a little longer than I'd like to admit, I was double-clicking the End Event every time I needed to configure a return value in a microflow. It gets the job done, but there's a much quicker approach. If you already have the object, list, or value you want to return, simply right-click the activity that produces it (such as a Retrieve, Create Object, Aggregate List, or Call Microflow activity) and select Set as Return Value. Studio Pro will automatically configure the End Event and set the correct return variable for you. It's a small feature, but when you're building and testing microflows throughout the day, removing a few extra clicks can make development feel much smoother and faster.
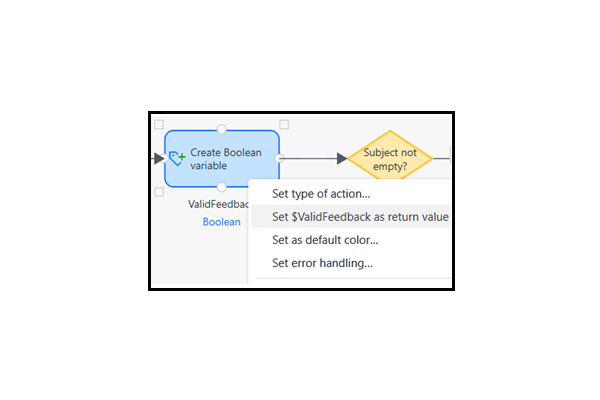
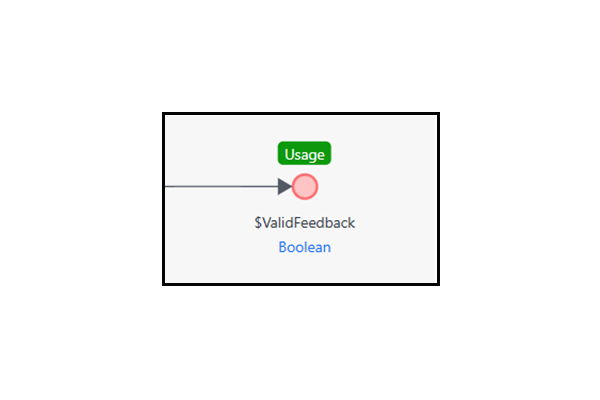
Where to find it: Right-click any activity that produces a variable → Set as return value
Align and Distribute
As microflows grow in size and complexity, it's easy for activities to become misaligned or unevenly spaced, especially after making changes or inserting new logic. Rather than manually dragging activities into position, you can select multiple activities, right-click, and use the Align or Distribute Horizontally options. Studio Pro will instantly organise the selected elements into a cleaner, more consistent layout. This feature isn't just useful for improving readability. Well-structured microflows are easier to navigate, review, and maintain, particularly when collaborating with other developers. What's more, these alignment tools aren't limited to microflows, they're also available in the Nanoflow and Rule editors, making them a simple but effective way to keep your logic visually organised across your application.


Where to find it: Select multiple activities in the microflow editor → right-click → Align or Distribute horizontally / Distribute vertically
Best Practice Recommender
One of the first habits I was encouraged to develop as a Mendix developer was checking the Best Practice Recommender regularly. Located alongside tabs such as Console and Debugger, it scans your entire application for common issues and optimisation opportunities. The recommender highlights a wide range of potential concerns, including commits inside loops, missing database indexes, and naming convention violations. Rather than simply flagging an issue, it also provides context on why it matters and how it could affect your application's performance, maintainability, or adherence to Mendix best practices.
For a more detailed explanation, you can right-click any recommendation and select View Best Practice Recommendation. This opens a detailed breakdown of the issue, its potential impact, and suggested remediation steps. In many cases, Studio Pro can even apply the fix for you. For example, when a microflow can be converted into a nanoflow, the recommendation dialog includes a Convert button that performs the change automatically. Whether you're new to Mendix or working on a mature application, the Best Practice Recommender is a valuable tool for maintaining quality and identifying improvements that might otherwise be overlooked.


Where to find it: View → Best Practice Recommender
Export Microflow as Image
When working through a complex piece of logic, there are times when it's helpful to get a second opinion from a colleague or share your implementation with a wider team. In these situations, exporting the entire microflow as a single image can be far more convenient than capturing and stitching together multiple screenshots. With a microflow or workflow open, navigate to File > Export as Image. Studio Pro will generate an image of the entire canvas, regardless of its size or length, making it easy to share the full context of your logic in one file. Before exporting, you can choose options such as the zoom level and whether the background should be transparent or opaque, allowing you to tailor the output for documentation, presentations, support requests, or team reviews. It's a simple feature, but one that can save time and make collaboration much easier when discussing larger or more complex implementations.


Where to find it: Open any microflow or workflow → File menu (top bar) → Export as image
Keyboard Shortcuts Worth Knowing
Keyboard shortcuts are one of the easiest ways to speed up day-to-day development in Studio Pro. While many are documented, some took me a while to discover and have since become part of my regular workflow.
Quickly Find Documents with Ctrl + G: Ctrl + G opens the Go to Document search, allowing you to search across every module in your project, including pages, microflows, entities, snippets, and more. You don't need to enter the full document name. Studio Pro matches against fragments of names, so typing something like book conf will still locate Booking_Confirmation. It's a much faster way to navigate large applications than manually browsing through folder structures.
Advanced Searching with Ctrl + Shift + F: Ctrl + Shift + F opens Find Advanced, one of the most powerful search tools in Studio Pro.Beyond simple text searches, it can be used to locate unused items, find specific action types across the entire application, and identify documents with version-control changes. The Unused Items search is particularly useful when cleaning up an application ahead of a release. A related feature can be found within the domain model. By right-clicking an entity and selecting Find usages in actions, Studio Pro opens Find Advanced with the appropriate filters already applied. This displays every relevant microflow action (such as Create, Retrieve, and Change activities) that interacts with the selected entity, saving you from having to configure the search manually.
Navigate Large Canvases More Efficiently: When working in microflows, nanoflows, rules, or domain models, these navigation shortcuts can make it much easier to move around larger canvases:
- Shift + Mouse Wheel – Scroll horizontally
- Ctrl + Mouse Wheel – Zoom in and out
- Middle Mouse Button + Drag – Pan around the canvas
- Space + Click and Drag – Alternative method for panning
These shortcuts are particularly useful when working with larger microflows where frequent zooming and navigation is required.
Switch Between Open Documents: If you're working across multiple pages, microflows, and domain models, document-switching shortcuts can help maintain your flow:
- Ctrl + Tab – Move to the next open document
- Ctrl + Shift + Tab – Move to the previous open document
Edit Activity Captions Quickly: Rather than opening properties manually, Shift + F2 allows you to edit the caption of the currently selected activity directly, making small updates quicker and less disruptive to your workflow.
Call Hierarchy
Before making changes to a microflow, it's often useful to understand how it fits into the wider application. Refactoring becomes much safer when you know exactly what depends on a microflow and what that microflow depends on in turn. Introduced in Mendix 11.1, the Call Hierarchy pane provides this visibility in a single view. To access it, right-click any microflow or nanoflow in the App Explorer and select Show Call Hierarchy. Studio Pro opens a dedicated pane containing two tabs:
- Incoming – Shows every microflow, nanoflow, page, or action that calls the selected item.
- Outgoing – Shows every microflow, nanoflow, and action that the selected item calls.
While it's possible to gather similar information using Find Usages, doing so often requires multiple searches and some manual investigation. The Call Hierarchy pane presents both directions together, making it much easier to understand dependencies before making changes. I've found it particularly useful when working in unfamiliar parts of an application. A quick look at the hierarchy can reveal whether a seemingly small change affects a handful of processes or a significant portion of the system, helping to avoid unintended consequences during development.

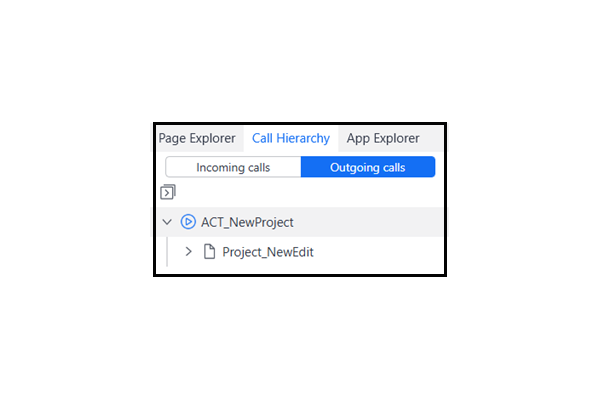
Where to find it: Right-click any microflow in the App Explorer → Show call hierarchy. Or View → Call Hierarchy Pane
Getting More Out of Maia Chat
As I've become more comfortable with Studio Pro, I've found myself using Maia Chat increasingly often. While it's easy to think of it as a tool for answering questions, I've found it particularly useful for automating repetitive tasks and reviewing my work before handing it over for review. Here are a few prompts that have consistently produced useful results.
"Generate an enumeration with these values [paste your list]" - If you already have a list of values in a spreadsheet or requirements document, try this rather than creating each enumeration value manually, Maia can generate the entire enumeration in one step, making it much quicker to translate requirements into your domain model.
"Add these 10 attributes to the Customer entity" - When creating or updating entities, Maia can handle bulk changes with prompts such as this, this is particularly useful when working from requirements documents containing long lists of fields, saving time and reducing the chance of manual errors.
"Make this microflow more efficient" - With a microflow open, try asking this, Maia will analyse the logic and highlight potential improvements, such as redundant activities, unnecessary processing steps, or opportunities to simplify the flow. While it's not a replacement for an experienced developer review, it can provide a useful sense check.
"Analyse my module structure and suggest improvements" - For larger applications or inherited projects, this prompt can be surprisingly useful. Maia reviews your folder structure, naming conventions, and document organisation, then provides recommendations based on Mendix best practices. It's a helpful starting point when planning a clean-up exercise or refactoring effort.
Maia Chat can be opened from View → Maia Chat or via the Maia panel on the right-hand side of Studio Pro, alongside the Properties and Toolbox tabs.
Maia Features Hidden in the Right-Click Menu
Some of Maia's most useful capabilities don't require opening the chat panel at all.
Maia Explain: Right-clicking a microflow or nanoflow in the App Explorer and selecting Maia Explain generates a clear summary of its purpose and behaviour. The explanation covers the overall objective, key logic steps, and anything notable about the implementation. This is particularly valuable when working in an unfamiliar codebase or picking up development work mid-sprint. Instead of tracing through every activity manually, you can gain a high-level understanding of the logic in seconds. If you need additional detail, you can continue the conversation in Maia Chat with follow-up questions.
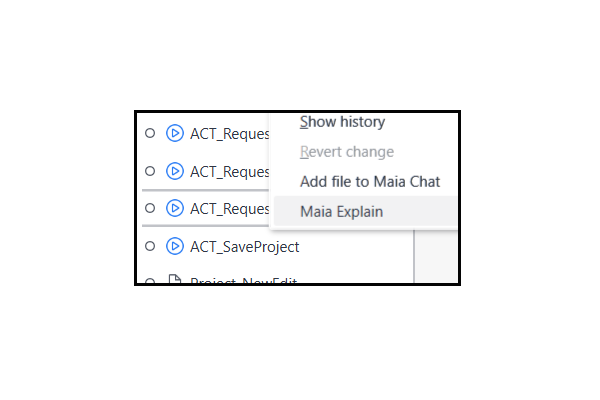

Where to find it: Right-click any microflow or nanoflow in the App Explorer → Explain or Maia panel on the right-hand side of Studio Pro
Generate validation microflow: Another useful option appears when right-clicking a Save button, a button configured with a Call Microflow action, or input widgets such as Text Box and Date Picker controls. Selecting Generate Validation Microflow opens a review screen showing all proposed validation rules before anything is created. This includes the attributes being validated, the validation conditions, and the corresponding error messages. You can add, modify, or remove rules before generating the microflow, giving you complete control over the final implementation. For forms containing large numbers of fields, this can save a significant amount of time while providing a structured starting point for form validation.


Where to find it: Page editor → right-click a button or an input widget → Generate validation microflow or Maia panel on the right-hand side of Studio Pro
Conclusion
From microflow shortcuts to Maia's built-in tools, none of the features covered in this article require additional setup or configuration, they're all available in the version of Studio Pro you're already using. In many cases, the biggest challenge is simply knowing that they exist and where to find them. While each tip may only save a few clicks or a few minutes at a time, those gains quickly add up across a typical development day. Features such as Call Hierarchy, the Best Practice Recommender, and Maia's productivity tools can also help improve code quality and make it easier to work confidently within larger applications.
Mendix continues to evolve rapidly, with new features and enhancements being introduced in almost every release. It's worth keeping an eye on release notes, community content, and product updates, as some of the most useful additions don't always feature prominently in training materials or learning paths. Hopefully, at least one of the tips above helps you work a little more efficiently in Studio Pro or introduces a feature you hadn't discovered yet.
More from Knowledge Hub
Continue exploring insights and strategies